stlite: How to Run Your Streamlit Apps in the Browser
stlite is a browser-based implementation of Streamlit that can run apps on a web page without having to deploy to a Streamlit server

Of course, there is always a server involved. A simple web page is loaded from a server (along with its dependencies) before being displayed in the browser.
By 'serverless' we mean that there is no server-based code that is an integral part of the web application. In a typical server-based application, such as a Flask app, the web page - typically as a result of a user action - will call a function on the server to retrieve new data and the web page will be updated with this data.
Streamlit is very much server-based: each time there is a user interaction the server is notified, the whole of the application is re-run on the server, and the web page is updated.
A Streamlit app is coded in Python so the server requires a Python interpreter along with the Streamlit library to run the app and generate the web page.
Pyodide
So, how can we operate without a server where the Python code runs?
Answer: Pyodide.
Pyodide is a Python interpreter that has been ported to Web Assembly (WASM) and so can run in a browser.
Being able to natively run Python in the browser is quite a thing; it means that we can run code that uses, for example, data science libraries that provide functionality that is not available in Javascript. And, on the other hand, because Pyodide provides communication with Javascript, the Python code can use Javascript libraries whose functionality is not available in Python (e.g. web graphics).
stlite
stlite is a port of the Streamlit library to WASM and combines with Pyodide to create a method of running Streamlit apps directly in the browser.
Why is that good?
Well, it means you can deploy Streamlit apps to any website and not have to rely on Streamlit Cloud or alternative hosting sites. Also, can use whatever deployment method suits you, you don't necessarily have to use GitHub - which may or may not appeal to you.
One thing that may not appeal to you is, that because everything resides in the web browser, it is potentially public: this means that you should not include anything secret in your app (such as API keys). But bearing these things in mind, let's see how we can create Streamlit apps in the browser.
Hello stlite
A stlite app is fundamentally an HTML page with embedded Python. You don't need to know HTML, though: the small amount that you need is boilerplate code that you can reuse for each app.
Below is the first app that appears on the stlite web page (reproduced here under the Apache2 license).
<!DOCTYPE html>
<html>
    <head>
    <meta charset="UTF-8" />
    <meta http-equiv="X-UA-Compatible" content="IE=edge" />
    <meta
        name="viewport"
        content="width=device-width, initial-scale=1, shrink-to-fit=no"
    />
    <title>stlite app</title>
    <link
        rel="stylesheet"
        href="https://cdn.jsdelivr.net/npm/@stlite/mountable@0.39.0/build/stlite.css"
    />
    </head>
    <body>
    <div id="root"></div>
    <script src="https://cdn.jsdelivr.net/npm/@stlite/mountable@0.39.0/build/stlite.js"></script>
    <script>
        stlite.mount(
'
import streamlit as st

name = st.text_input('Your name')
st.write("Hello,", name or "world")
',
        document.getElementById("root")
        );
    </script>
    </body>
</html>
It's a 'hello world' program that prompts for a name and says 'Hello' to that name or 'Hello world' if no name has been entered.
The Streamlit code is enclosed in quotes and inside the call to the function stlite.mount. This function is from the Javascript library that was loaded earlier in the listing (as was the stlite css file) and it runs the Streamlit code inside the HTML element specified in it's second parameter, i.e. document.getElementById("root").
Load this page in your browser and you will see the following.

It's the same as you would get by running the Streamlit code as a separate app. The only difference is the startup time: a stlite web page has to load and execute the Javascript library which is a fairly lengthy process, so you will see various messages flashed up on the screen while the app is loading. This delay occurs only once; afterwards the app has loaded it is quick to run.
This first stlite app can be run directly in the browser (e.g. by double-clicking it in the file explorer). However, the next programs that we will encounter will consist of more than one page and so, in order to avoid CORS errors, we need to run them in a local server. So, navigate to the folder where you store the files and run the command:
python -m http.server
Depending on your set up, you may need to use python3 instead of python.
this command will start a local server and if you open localhost:8000in your browser you will see a list of the files that you can run in the browser.
Separate files
I'm not keen on mixing different languages in the same file and luckily stlite allows us to separate the python files from the main HTML. We do this by specifying the file path in the stlite.mount()function instead of the actual code. The call to mount will look something like this:
stlite.mount(
    {
    entrypoint: "hello.py",
    files: {
        "hello.py": {
        url: "hello.py",
        },
    },
    }
Instead of a simple string containing the code the we specify a dictionary. The first entry in the dictionary is the file which will be the starting point for the app (yes, you can have more than one file!). The second entry specifies the file names and the url of the file (these are not the same, the entrypoint is the name in the virtual file system that Pyodide uses; url refers to the path to the original file in your file system.)
So, in this code we are telling stlite to copy the file "hello.py" in your local file system into a file of the same name in the local file system. And previous to that we specified a file virtual file system as the starting point for the app.
The full code for the HTML file is shown below. As you will see it is pretty similar to the first program except for the changes detailed above.
<!DOCTYPE html>
<html>
<head>
    <meta charset="UTF-8" />
    <meta http-equiv="X-UA-Compatible" content="IE=edge" />
    <meta name="viewport" content="width=device-width, initial-scale=1, shrink-to-fit=no" />
    <title>stlite app</title>
    <link rel="stylesheet" href="https://cdn.jsdelivr.net/npm/@stlite/mountable@0.39.0/build/stlite.css" />
</head>

<body>
    <div id="root"></div>
    <script src="https://cdn.jsdelivr.net/npm/@stlite/mountable@0.39.0/build/stlite.js"></script>
    <script>
    stlite.mount(
        {
        entrypoint: "hello.py", // The target file of the `streamlit run` command
        files: {
            "hello.py": {
            url: "hello.py",
            },
        },
        },
        document.getElementById("root")
    );
    </script>
</body>

</html>
Now we need to write the actual Python code in "hello.py".
import streamlit as st
st.markdown("# :balloon: Hello from :red[stlite] :balloon:")
Now when we run the HTML in the browser we wil see this:

Multiple files and libraries
Streamlit supports multiple pages and so does stlite. We simply need to add extra file specs to the dictionary passed to stlite.mount - you see the idea in the code below.
stlite.mount(
    {
    requirements: ["matplotlib"],
    entrypoint: "hello.py", // The target file of the `streamlit run` command
    files: {
        "hello.py": {
        url: "hello.py",
        },
        "pages/histogram.py":{
        url: "histogram.py"
        }
    },
    },
    document.getElementById("root")
);
Here the dictionary now contains to entries, the original "hello.py" and a new file that is located in the pages folder called histogram.py. (You probably already know that the pages folder is where Streamlit expects to find the files for a multi-page app.)
The additional file draws a histogram from a set of random numbers, so we need to import the matplotlib library to draw the chart. In addition to the Python import, we also need to tell Pyodide which libraries we are going to use. This is done in an additional dictionary entry:
requirements: ["matplotlib"]
Here is the full HTML code for the multi-page app.
<!DOCTYPE html>
<html>

<head>
    <meta charset="UTF-8" />
    <meta http-equiv="X-UA-Compatible" content="IE=edge" />
    <meta name="viewport" content="width=device-width, initial-scale=1, shrink-to-fit=no" />
    <title>stlite app</title>
    <link rel="stylesheet" href="https://cdn.jsdelivr.net/npm/@stlite/mountable@0.39.0/build/stlite.css" />
</head>

<body>
    <div id="root"></div>
    <script src="https://cdn.jsdelivr.net/npm/@stlite/mountable@0.39.0/build/stlite.js"></script>
    <script>
    stlite.mount(
        {
        requirements: ["matplotlib"],
        entrypoint: "hello.py", // The target file of the `streamlit run` command
        files: {
            "hello.py": {
            url: "hello.py",
            },
            "pages/histogram.py":{
            url: "histogram.py"
            }
        },
        },
        document.getElementById("root")
    );
    </script>
</body>

</html>
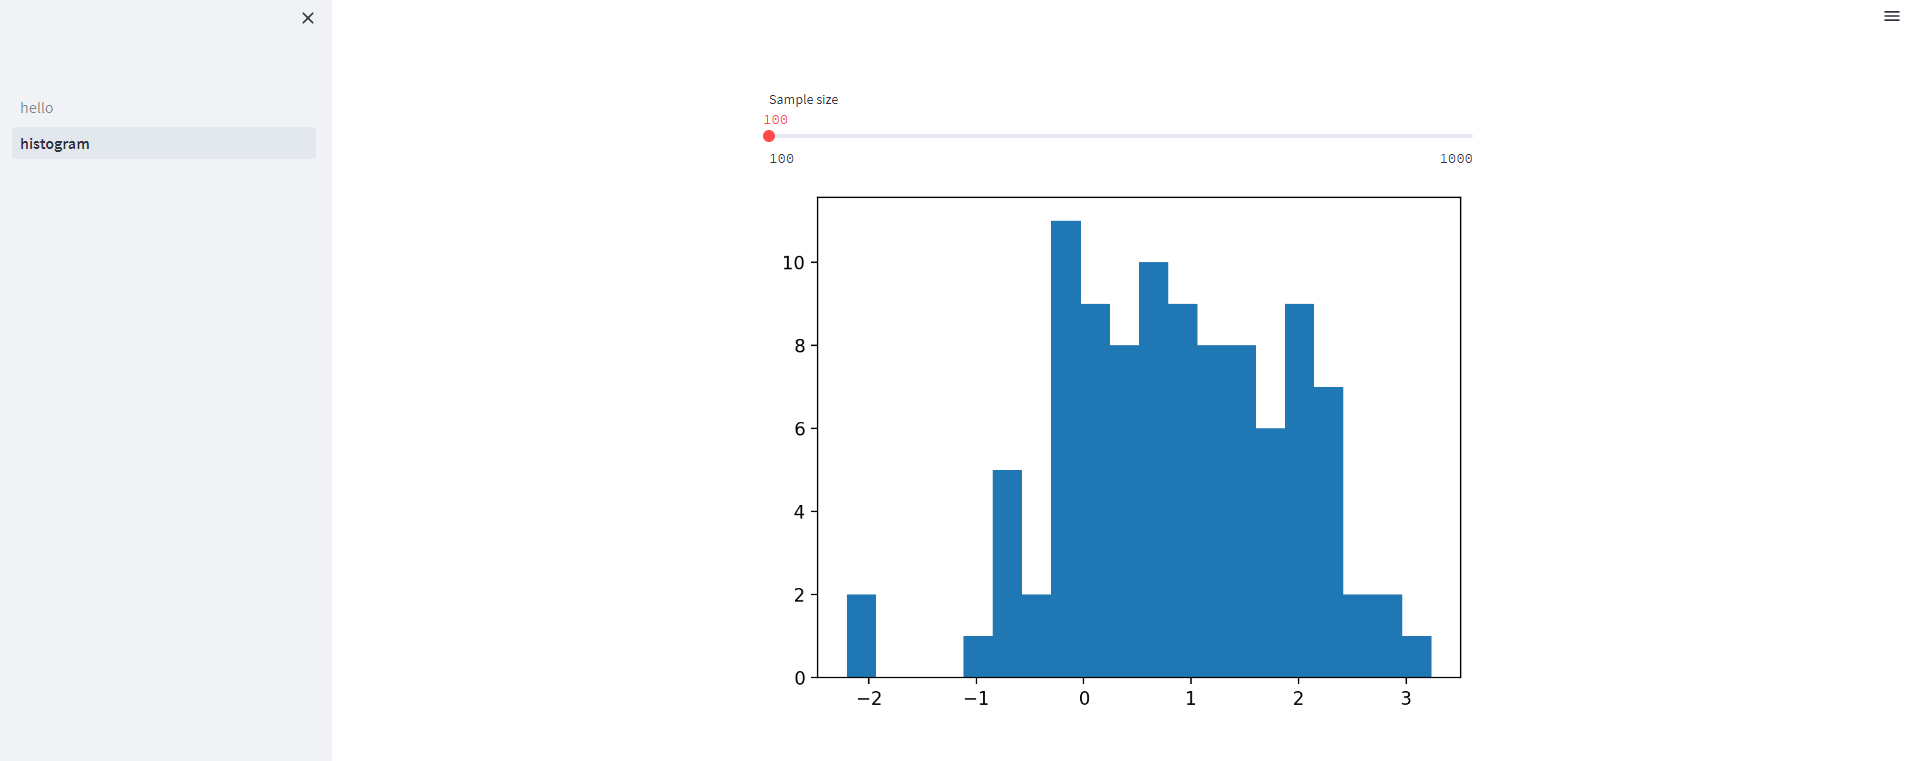
And here is the new Python code that is in the file pages/histogram.py
import streamlit as st
import matplotlib.pyplot as plt
import numpy as np

size = st.slider("Sample size", 100, 1000)

arr = np.random.normal(1, 1, size=size)
fig, ax = plt.subplots()
ax.hist(arr, bins=20)

st.pyplot(fig)
The combination of these file produces a typical Streamlit multi-page application with the navigation in the sidebar.
Conclusion
That a brief run through of stlite and I hope you have found it useful.
stlite provides us with a fairly simple way of producing serverless Streamlit app that can be uploaded as static pages to, for example, GitHub Pages, or any other static HTML file server. It support mult-page applications and let's us load libraries such as matplotlib.
You can find more details in the stlite GitHub repository (see Notes below) and you can find the source code for this article in my GitHub repository, here.
Thanks for reading!
Notes
-
The stlite GiHub repository is here
-
Some of the code in this article is derived or copied from stlite in accordance with the Apache2 license.
-
All images/screenshots are by me, the author, unless otherwise noted.
-
You can find more articles on Medium or via my website and you can subscribe to my occasional newsletter, here.
Streamlitfrom Scratch
Streamlit is a framework for creating Data Science apps in Python.
Streamlit from Scratch is an ebook that will teach you how to get started with
Streamlit.
How Charts Work: Understand and explain data with confidence
From the Back Cover
How Charts Work brings the secrets of effective data visualisation in a way that will help you bring data alive. Charts, graphs and tables are essential devices in business, but all too often they present information poorly. This book will help you:
The Art of Statistics: How to Learn from Data
Discover how data literacy is changing the world and gives you a better understanding of life's biggest problems. I have used this book in various articles and found it to be invaluable.Plotting with Pandas
Plotting with Pandas: an Introduction to Data Visualization is an ebook that covers basic and statistical plots using Python and Pandas, line and bar charts, scatter plots, pie charts, histograms, box plots, etc.